How to upgrade the RAM and SSD of your ROG Zephyrus G14 or G16 laptop
When you finally buy that perfect laptop, you want it to last as long as possible—and upgrades allow you to stretch its lifespan laptop further. When you start to reach the limits of that RAM and of storage, grab your screwdriver and start upgrading.
Our Zephyrus laptops are designed to be ultra-portable, especially when compared with the power-packed Strix lineup. But despite their thin and light chassis, the ROG Zephyrus G14, Zephyrus G15, Zephyrus M16, and Zephyrus G16 are user-upgradeable—so if you need more storage space for that next game, here's how to open it up for some DIY improvements.
Which Zephyrus laptops are upgradeable?
Not all Zephyrus laptops feature the same upgradeability. Models from 2023 and earlier feature upgradeable RAM and storage, allowing you to replace your SSD or add more memory for multitasking and other tasks. those models feature one upgradeable RAM slot rather than the traditional two slots, since some some memory soldered to the motherboard to keep the chassis slim. The M.2 2280 SSD slot is fully upgradeable as normal.
Later Zephyrus models with the CNC-milled aluminum chassis — with model years 2024 and newer — are even slimmer, and thus have all their memory soldered to the motherboard, so you cannot upgrade the RAM. You can still upgrade the SSD, however, for more storage.
For the purposes of this guide, we'll use a 2024 Zephyrus G14 as our example laptop, but we'll note in the text and photos where steps may differ between different models.
Step one: gather your parts
To open your laptop, you'll only need a couple household tools:
- A size 0 phillips head screwdriver
- A size T5 torx screwdriver (2024 models and newer; TR5/T5H will also work)
- A guitar pick or other piece of thin plastic
You'll also need some compatible RAM or storage to go in the machine. For example, the 2022 Zephyrus G14 laptop we'll mention later in this guide uses DDR5 SODIMM memory, ideally 4800MHz CL40 or better. This particular model has 8GB memory on board, with one upgradeable slot supporting DIMMs up to 16GB in size. So if I wanted to max out the machine with 24GB of memory, I'd grab a single 16GB stick (16GB stick + 8GB onboard = 24GB total). You can find RAM at your favorite e-tailer or brick-and-mortar PC hardware store.
To upgrade the SSD, look at M.2 PCIe 4.0 NVMe solid-state drives, or SSDs. You'll find these ranging from 250GB up to 2TB or more. However, you'll need to make sure the drive is slim enough for the chassis you have (single-sided SSDs for the 2024 and newer models, for example). And, since there's only one free M.2 slot, you'll want to buy a new drive with as much storage as you think you'll need for the future. You can use ASUS Cloud Recovery as described below to reinstall Windows from scratch, with all the important ASUS drivers and software in tow, though this will erase your data, so back it up before continuing. Alternatively, you can pop your new SSD into an M.2 NVMe PCIe USB enclosure, and clone your G14's existing Windows installation onto the new drive first.
When in doubt, check your laptop's product page on rog.asus.com for more information on which types of memory and storage it supports, or ask the reps at your favorite retailer for recommendations.
Step two: open your laptop
Once you've purchased your upgrades (and copied your Windows installation, if applicable), it's time to get inside your machine. Before you get to work, discharge your battery to 25% or below.

Place your laptop face down, ideally on a soft surface (like our ROG Scabbard desk mat) so it doesn't get scratched. Grab your screwdriver and remove the screws along the bottom of the case. You may find that some of the screws are underneath rubber pads or feet on the bottom of the laptop, which you can easily remove with some tweezers. The screws vary in length, so it's best to keep your screws in a parts tray or baking sheet arranged the same way they are on the laptop, so you know where they go when all is said and done.

On pre-2024 models, there's one screw that won't come out all the way, and that's by design-this captive Pop-open screw helps lift the bottom cover of the laptop so you can more easily access the internals. Once loosened, you should be able to start removing the bottom panel, and the screw will stay attached.

Next, use your guitar pick or pry tool to free the clips holding the bottom case together. Slide your guitar pick in between the two panels, angled slightly, and press upward and inward. You should hear a click as the clips release, letting you know you're free to slide on over to the next one. If you run into trouble, make sure you've undone all the screws first.

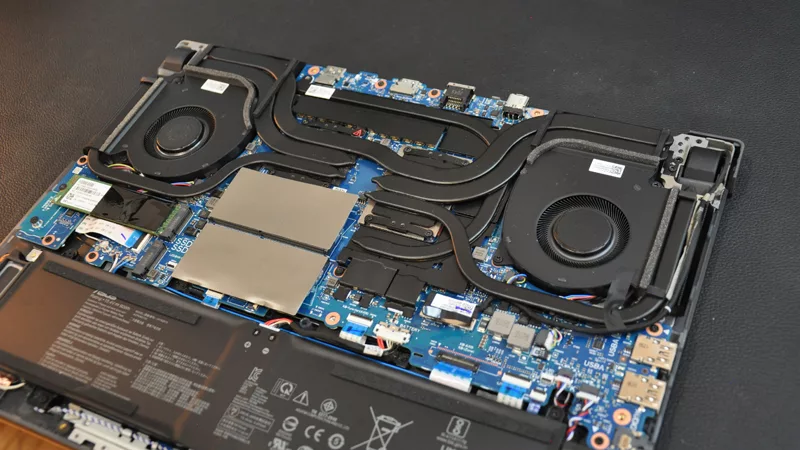
Once unclipped, lift the bottom case up carefully, and you’ll have full access to the internals of your laptop.
Step three: upgrade your components

Before continuing, it's a good idea to disconnect the battery for safety. You should be able to trace the cable coming out of the battery to its socket on the motherboard. Slide the metal plate back to unlock the connector, and pull the battery connector up and out of the socket.

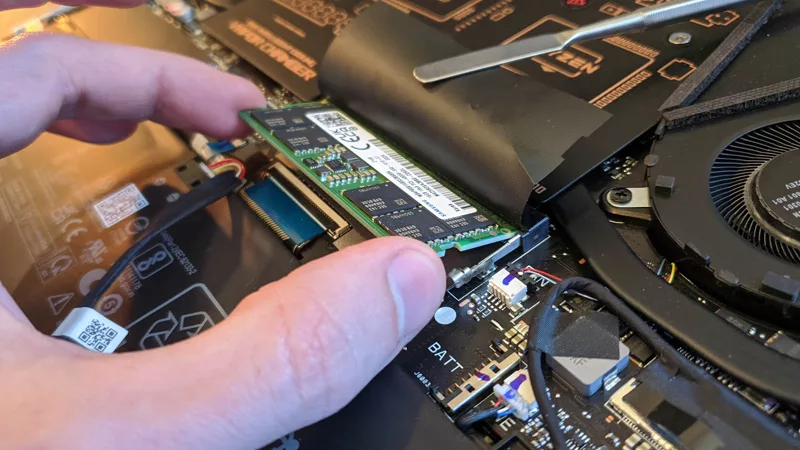
Now you're ready to upgrade the RAM and/or SSD. To upgrade the RAM on pre-2024 models, peel back the black cover to reveal the DIMM underneath. Squeeze the two metal levers on the side of the RAM stick, then pull the stick out of its slot. To insert the new stick, repeat this process in reverse: slide it in diagonally until the gold contacts are firmly in the socket, then press down on the sides of the stick until the levers snap into the notches on the side. Re-apply the black cover, and you're done!

To upgrade the storage (no matter what model you're upgrading), locate the M.2 SSD under the longer black strip and remove the screw holding it in place. Slide the SSD out of its socket, and replace it with the new one. Replace the M.2 screw to hold it in place.

Before you close back up, check the fans for any dust and debris that may have built up over time. We put dust filters on the Zephyrus G14 to minimize this as much as possible, but it's a good idea to check while you have the laptop open. If necessary, do a quick cleaning pass with a soft cloth (or brush)—the cleaner the fans, the longer your machine will stay in tip-top shape.
Step four: boot up and game on

Once closed back up, plug your laptop into the wall and press the power button. If you installed a brand new SSD, it will boot you into the BIOS, where you can navigate to Advanced > ASUS Cloud Recovery and begin the Windows reinstallation process. It will take some time, and reboot multiple times during the process — leave it alone until it lands on the out-of-the-box Windows setup where you choose your language.
Alternatively, if you cloned your previous drive, you should be right back into Windows as if nothing changed. If you run into trouble along the way, contact ASUS customer support. In fact, certain regional offices may be able to install your upgrades for you, if you aren't comfortable doing it yourself. Reach out with any questions, and our talented support staff will lay out all your options.
Once into Windows, make sure your RAM was installed properly by opening Armoury Crate and check the amount of RAM it's reporting. You should see the full amount you installed here. If it isn't showing the full amount, open the laptop back up and ensure the stick is inserted all the way.
Similarly, if you upgraded the SSD, open up Windows Explorer to make sure it shows the correct amount of storage. If it doesn't, you may need to clone the drive again, properly extending the C: partition when setting up the clone so it takes up the maximum available free space. If everything is installed and working properly, fire up Steam and start gaming–faster and better than ever.
Author
Popular Posts

The ROG XREAL R1 gaming glasses let you game anywhere on a 171-inch 240Hz virtual screen
How to adjust your laptop's P-Cores and E-Cores for better performance and battery life

How to Cleanly Uninstall and Reinstall Armoury Crate

The ROG Strix OLED XG259QWPG Ace is a tournament-ready OLED designed for esports pros

Brighter, bolder, better: The ROG XBOX Ally X20 bundles a larger OLED display with AR gaming glasses
LATEST ARTICLES

How to clean your mouse pad
With a few simple steps, you can help preserve your mouse pad's performance and keep your desk mat looking as sharp as the rest of your setup.
How to clean your OLED monitor
Keeping your OLED monitor looking pristine is surprisingly simple. You just need a microfiber cloth and the right technique.

How to enable Xbox mode to reduce RAM usage when gaming on Windows
Here’s how you can enable Xbox mode for Windows 11 PCs to score a more streamlined, controller-friendly experience.